Tuesday, February 18, 2014

NQA, Columbus, OH I'm teaching at this show!!!


Hope to see you there, I'm teaching 4 classes, 2 piecing and 2 longarm. I will also be in the Accomplish Quilting booth, come by and see me!
Special Edition!!

NQA Online Quilt Show Registration is Now Available!! 


We've done it!  The new website and online registration is ready for you.  This is how it works-

1) Go to www.nqaquilts.org  

2) Use the button under Quick Links called ‘Quilt Show’

3) Use the button under Workshop Info called ‘Register Here’

4) Fill out the information, and click on the choices of the classes you are interested in.  A full class will be indicated automatically, and the system will prevent you from overbooking (trying to sign up for conflicting times) automatically as well.  All of the highlighted fields (teacher names and class names) are links that you can use to get more details, and the supply lists are available through those boxes, too.  Have fun, and when you are ready, your registration shows up at the bottom, your total is there, and you choose the ‘register’ button to complete this step and go to the checkout!

5) From the checkout, you can increase the number of dinners if you would like, or cancel your choices all together and start over, or you can even choose ‘modify’ and the system will take you back to the filled out form on the previous page.  

6) Use the online payment system through Paypal to pay by credit card securely.

This year's show is truly a special milestone in NQA's history, and you are an important part of making it so! 


Friday, February 14, 2014

Longarm quilting

This week I have been working on a customer's quilt that she wants to enter into a national show. And guess who woke up with a fever last night around 2am?
Even though I don't feel very good, I still worked on her quilt this morning. I have had to call it quits for the day. So, I thought since I'm resting in bed for the rest of the day, I thought I'd post my pictorial tutorial.
I used the following rulers for straight lines, some circles and arcs. Straight lines I used the Mini straight tool from Quilter's Rule. It has grid lines, curve and a 45degree line. For my center circles I used Dusty Farrell's Pocket Pebbler and for the arcs, I used Lisa Calle's arc ruler pack/set. You cannot purchase these arcs separate, I believe there are 5 different arc rulers in the set. I love Lisa's arcs!!
 I'm hoping my work shows up, as I'm typing this out the pics don't look that great, I apologize now! They were clear on my camera.
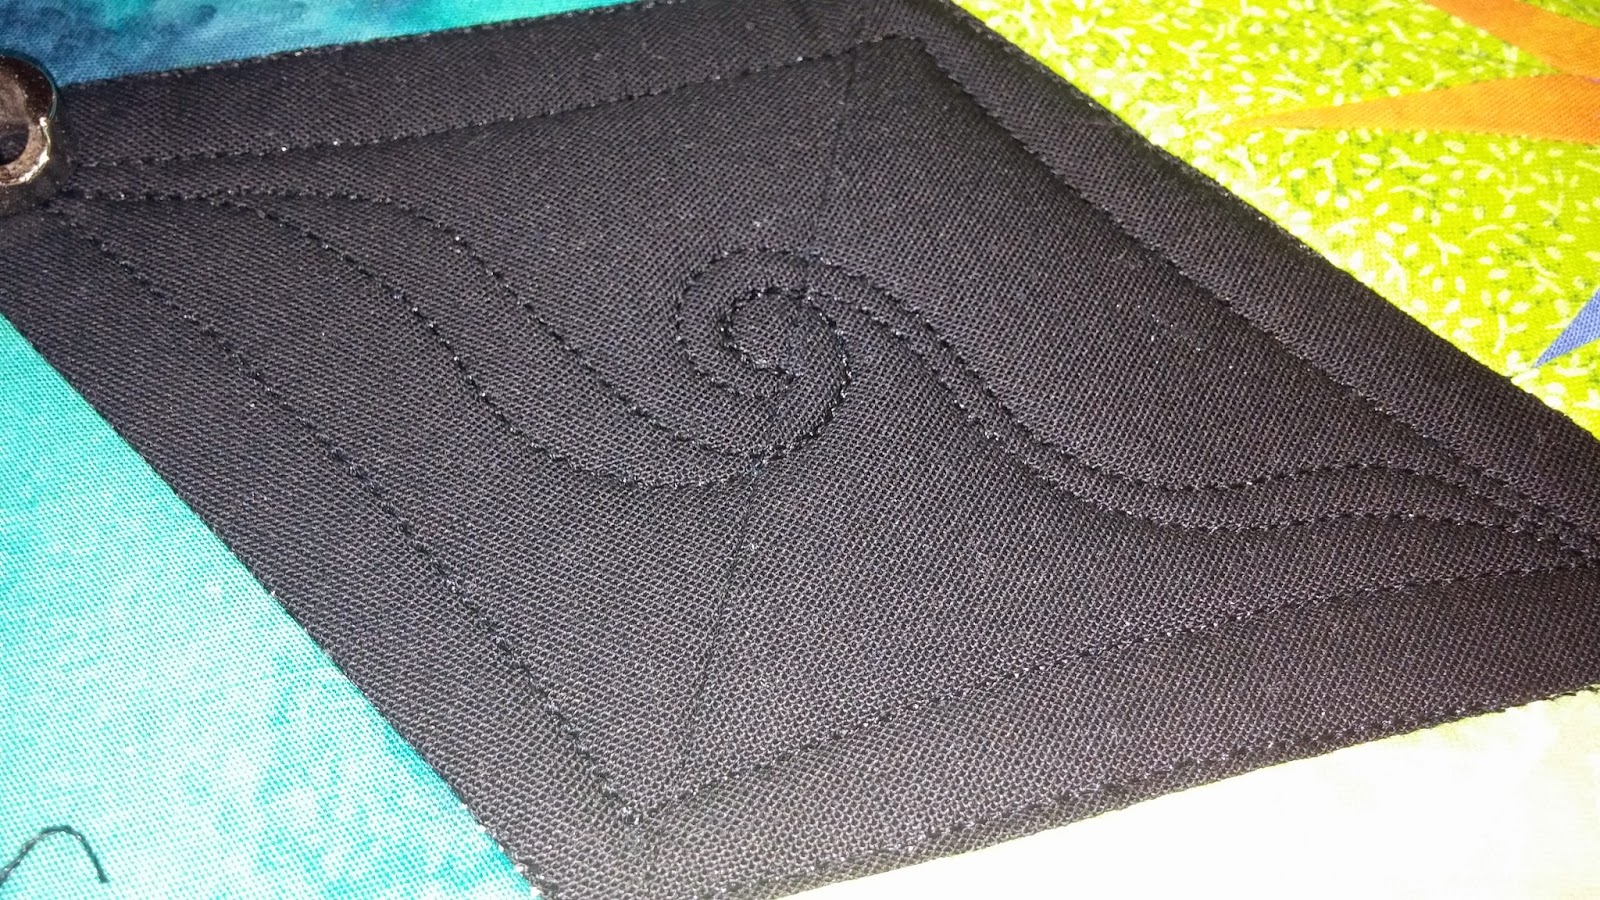
I began this quilt by stitching in the ditch on all the blocks/shapes. The black diamonds were what I began quilting first. With these diamonds, I stitched a circle in the middle of the diamond.


I place Dusty's pocket pebble in the center, I use the registration lines on the ruler and line them up with the diamond points on all 4 corners of the diamond. There is a center seam on these diamonds so it is easy to find the center. This ruler separates at both ends so that you can open the ruler and place the correct circle size you need. First, I get my needle in place, pull up the bobbin thread, then place the ruler where I need it. I do "test" that it is in the center first. Once all is in place, I place my left hand on the ruler, and stitch around. You don't have to have a death grip, just hold steady and in place :). I also make sure my hand is down on the ruler, meaning my palm and all fingers are out of the needles ways! I don't hold the ruler in place with my finger tips. I have learned my lesson and over worked the tendons in my fingers and now have developed arthritis. So, please place your hands on these rulers properly. I speak from experience.
Pocket Pebbler ruler by Dusty Farrell

Next, I used a chalk marker and Lisa Calle's arc and drew my shape you see
in the diamond. Now, the trick was remembering to start in the middle not on the outer edge/point :)
I use the arc ruler and stitch the lines, I continue all the way around. When I get back to my starting point I then go and fill in the designs on the inside and outside. See the beginning picture of what I drew/stitched.
Next diamond design:
This diamond I did the same as before, stitched that center circle first using the same ruler and lining up the registration marks. Second step, I used the Mini ruler tool from Quilter's Rule to stitch the outer straight lines. I used the first registration line, which is 1/4" line, plus the hopping foot running along side the ruler makes a nice space for little free hand stitched circles. As you are stitching the interior line, make sure when it is time to stop and turn the ruler you are needle down. Once the interior border line is stitched I removed the ruler and began drawing circles, freehand. I try not to stitch right on top of the interior stitched border line. I don't want too much of a thread build. Next I brought my quilter's rule tool back and used the curve side of the ruler to make the shape that surrounds the center circle. Watch how you place the ruler/curve.

Next is the third diamond:
With this diamond, I only used Lisa's arc. Lisa's arcs have wonderful registration marks:
I lined up the first registration line along the seam line, checked the location of where the needle was going to end. I wanted it to be equal on all 4 sides of the diamond. Also I did not want a huge curve/arc, just a tiny bit. I began stitching in one corner working my way around. Don't forget, needle down when it is time to stop and change directions. Sometimes I turn the machine off so I can flip the ruler around and make sure I am aligning it up. After the arcs are completed I stitched a swirl from end to end, the longer length of the diamond.


Once all 4 sides/arcs are done I stitched "c's", continuous "c".
I hope you enjoyed my pictorial tutorial. Still more to stitch on the quilt, but with having a fever I just can't do it today.
I hope to be able to put more about how I quilted this quilt in the next couple of days, lets hope I feel better tomorrow.
Happy sewing!!

Thursday, February 13, 2014

Preparing for next week

This week is all about getting ready for next week! LOL
Next week, I fly to Mississippi.
Jackson, Mississippi to be exact :)
I can't wait to arrive!
While I am there, I will be teaching my Feathers class,
Fantabulous Feathers and Frivolous Fillers
at Stitch-n-Frame quilt shop located in Vicksburg, MS.
My feathers class is Friday.
Over the weekend I will spend with one of my best friends Dorinda!
I'm hoping that she and I can spend time piecing together and visiting with old friends.
I have not see these ladies in about 7 years.
Who are these ladies?
I met them when I lived in Mississippi 7 years ago. My husband's work took us down there for a short stay, only 3 years.
I became a member to Jackson Quilters guild, Quilts by Hearts Desire and Brandon Quilt Guild. I will be teaching 2 workshops while I am down there. One for Jackson Quilters and one for the Brandon guild.
The weekend is my only "down" time, but once Monday hits, we will be pretty busy till I fly back home on Thursday.
Thank you Roanoke for my flight!
Now to go a little backwards, I started out this morning talking about preparing for next week, well now lets talk about last week, I will begin with Virginia Beach and end with what I worked on Yesterday:
Founders Inn and Spa
Atrium where the Innovas were set up


courtyard
Sorry this quilt turned sideways, I can't get it to rotate :( it is a giraffe) This quilt was made on the longarm machine by Jo Ann Blade and Kim Diamond
one of the classrooms
Again, I can't get the picture to load correctly :(. So, this is a seahorse the quilt was made on the longarm machine by Jo Ann Blade and Kim Diamond
 The two quilt pictures: Sea horse and giraffe, I cannot tell you how gorgeous these 2 pictures are!!! Those two ladies are so talented and so wonderful!
I learned how to use the Innova 18" sit down longarm machine. I love it! If you don't have space for stand up machine set up then this is the way to go!!!
 That was last week...now on to this week :)


And here is a little more, don't know if you can see the work, but I stitched 1/8" curved cross hatching lines using Lisa Calle's Arcs.

I arrived home on Monday. I missed my family!! I enjoyed my experience in Virginia Beach, but there is nothing like coming back home and your kids (ages 27-17) giving you big hugs cuz they missed you! On Tuesday morning, my youngest son, John, who did not get to hug me on Monday when I arrived home (we saw each other in passing in our cars) walked over to me right after he woke up and gave me the biggest hug!!! OH I love my family!
Happy Sewing everyone!!!